Repurposing Baby Clothes
I was going through some of my daughter's clothes, looking for items that needed to be donated. I came across this Toy Story shirt that she loves. It is a little too short, so she doesn't wear it anymore, but instead of donating it, I thought I would make it re-wearable! Here is what I ended up doing to make her a whole new outfit out of some old clothes...

This is the Toy Story top, and another small top that I will use to make the Toy Story top longer.

I decided that I wanted to use the center piece (yellow and orange) to add onto the bottom of the shirt. So I measured how long I wanted the shirt to be and then cut out as much as I needed to make it that length.

The next step was to sew the hem. I am using a stretch knit, so I could have left the edges raw, and it would not fray, but I wanted to sew it and get a little ruffle into the bottom. Since this is stretch knit, I pulled the material a little as I was sewing, which gave it a ruffled look.

Once I had the bottom hem sewn, I just took the bottom piece and put it under the shirt.
- My piece fit the shirt perfect, so I didn't need to cut it in order to make it smaller. If you have a piece that is wider than your shirt you are adding it to, just measure, cut and sew the piece back together.
Once I had it lined up under my shirt, I pined it in place and used white thread and sewed right on top of the existing thread. Sew all the way around.

And you are done! Now you have your new and longer top! It is that easy!
I didn't stop here. My daughter has these pants that fit her from the waist, but they are too short on her. So I was going to make them into capris.
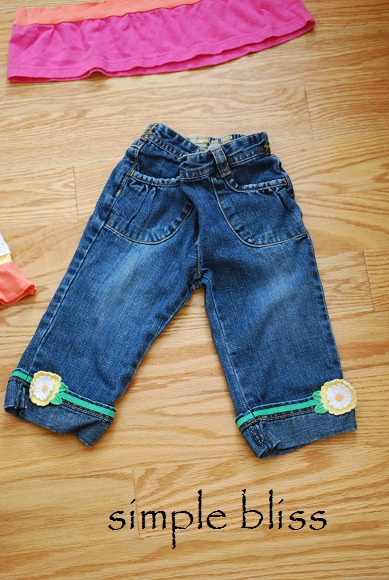
Here are the pants before. I really like the look of these, with the rolled cuffs and ribbon trim, so I was going to go with this look, but just make them shorter.


The first step was to seam rip the sides so that I would be able to cut them where I needed.

I took the length I wanted them to be, then added the extra inches for the cuff, and cut!

Now to the ironing board... I folded at the length I wanted the capris to be.

Then iron really well!

Unfold and iron the bottom up a little. Do this to the other side too.

Once you are done, roll them back at the first fold you ironed. And you have your new capris! I measured them to make sure they were both the same length and at the length I needed. Since they were right on, I took them to my sewing machine to sew the ribbon on. If you do not want to sew ribbon onto your capris, you will need to hand stitch the cuffs in place on each side to prevent them from coming apart.

Turn your capris inside out, and unfold the cuff once. You should have the small fold still folded (it will now be folded inwards - as you can tell, it is not visible in this picture because it is folded inside the pants.)

Take the pants and slip them onto your sewing machine. Cut your ribbon, heal seal the ends, and line it up to the edge of the fold. Sew all the way around. Do this to both sides. Once you have sewn both legs with your ribbon, you are done. Turn them right side out now, and fold your cuff back up. Your ribbon should be on the outside of your capris, and at the top of the fold.
This was so easy to do and doesn't take long at all! So before you donate those clothes, check to see if there is anything you can make with them! :)
Check out our new post!
Potterybarn dupe couches for half the price.


Adorable!
ReplyDeleteYour blogs have inspired me to do the same with old clothes.
I absolutely love this - how adorable! Now I want to go through my daughters old stuff and see what I can rip up and repurpose! Thanks for sharing your beautiful creations.
ReplyDeleteAdorable! And practical.
ReplyDeleteHi, i think that i saw you visited my blog thus i
ReplyDeletecame to “return the favor”.I am trying to find things to enhance my web site!
I suppose its ok to use some of your ideas!!
Also visit my blog post - nikeジョーダン